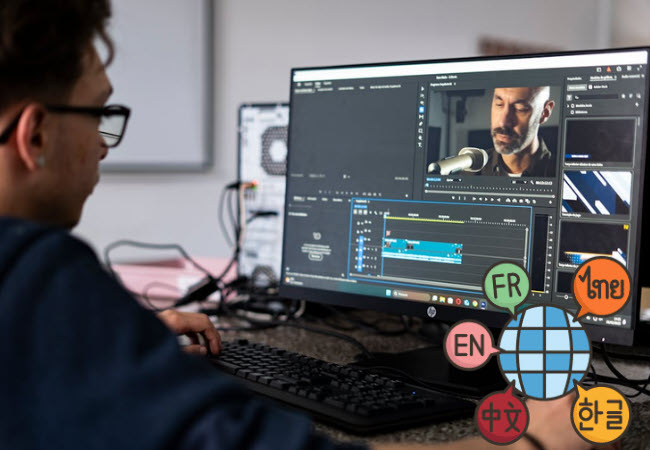
- Why Choose RecCloud AI Video Translator
- How to Use RecCloud AI Video Translator
- Common Issues about RecCloud AI Video Translator
Why Choose RecCloud AI Video Translator
- Super Easy to Use – No downloads or editing skills needed. Just upload and translate.
- Translate into 100+ Languages – Reach audiences around the world with accurate translations in seconds.
- Cross-platform feature – It can be accessed using any web browser on your computer or download the desktop app version for more advanced features.
- Flexible Export Options – Download your video with subtitles, dubbed voice, or the full translated version—your choice.
How to Use RecCloud AI Video Translator
RecCloud AI Video Translator lets you easily translate your videos into over 100 languages—no editing software or technical skills needed. Wherein just a few clicks, you can upload your video, choose a target language, and let AI handle the rest. Whether you want subtitles, dubbing, or natural voice cloning, RecCloud makes global content sharing fast and effortless.
How to Use Dubbing + Subtitles
Add both subtitles and AI-generated dubbing to your video at once. This option provides translated captions on-screen along with an AI voiceover—perfect for reaching international audiences with clear visuals and audio.
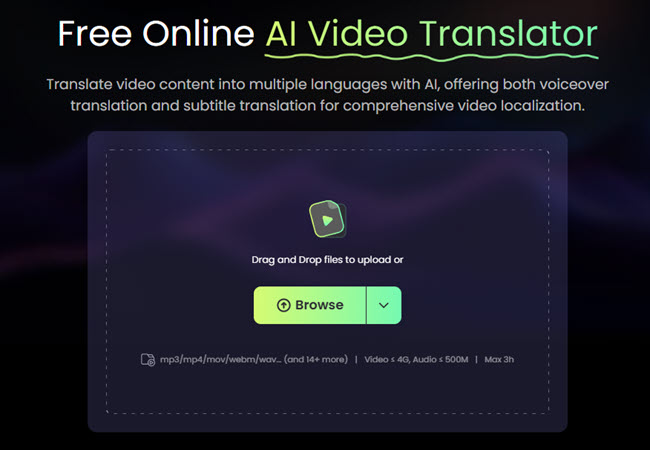
Step 1: Upload Your Video
Visit the tool’s official website and click the “Browse” button or drag and drop the media file to upload the media file from your computer. Apart from that, you can also upload files from RecCloud’s cloud storage by clicking the “My Space” option. This program almost supports the most popular formats, including MP3, MP4, MOV, WEBM, WAV, and more.
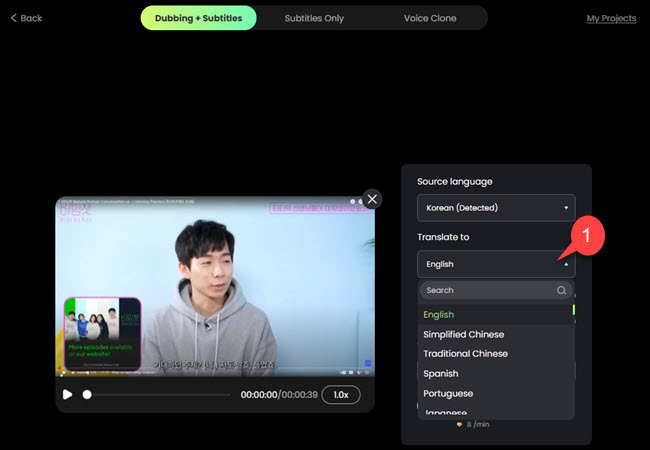
Step 2: Choose Your Target Language
The “Source language” tab shows the original language of the video, where AI will detect it automatically. Select the language you want your video translated into by clicking the “Translate to” dropdown menu to see all the available languages offered by this feature.
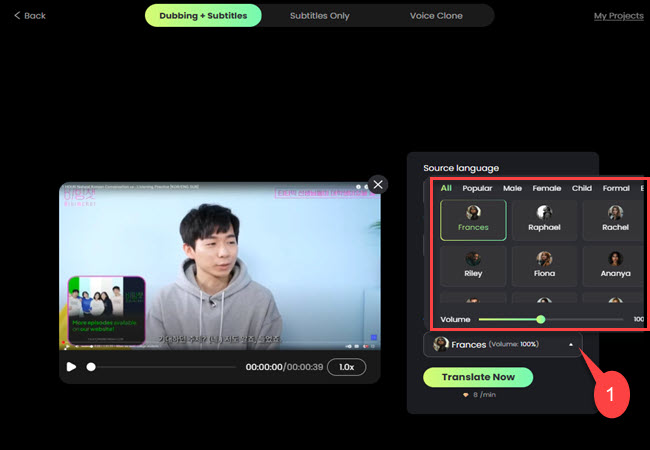
Step 3: Choose Your Voice
After that, click the “Voice Settings” to select the character you want to use in translating your video. From here, you can also adjust the volume after selecting the voice you prefer.
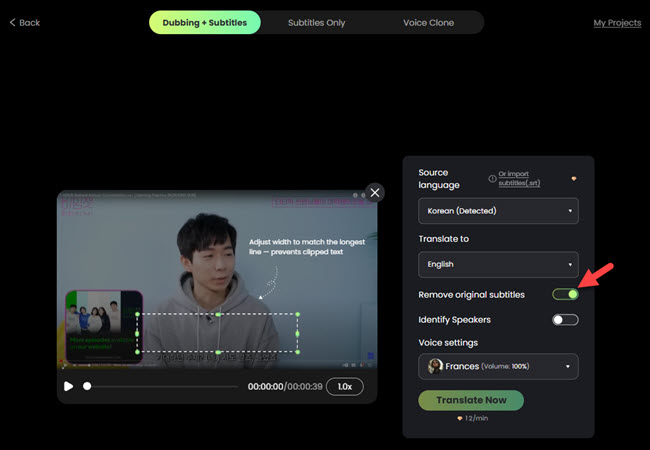
Step 4: Remove Original Subtitles
If you want to delete the original subtitle, you can tap the “Remove original subtitles” button. Adjust the “Selection” box to cover the original subtitles of the video.
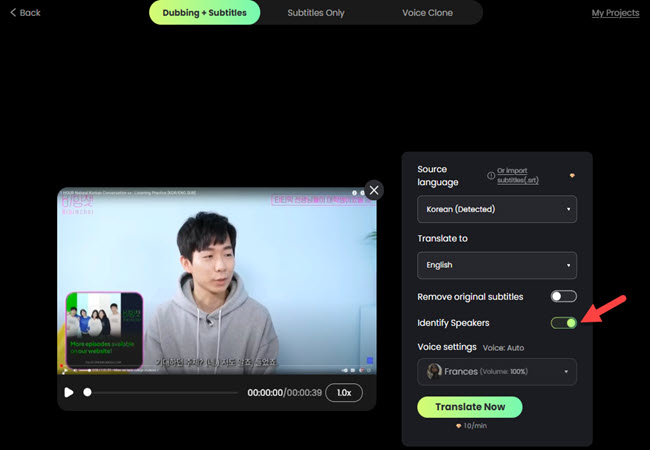
Step 5: Speaker Recognition Feature
Otherwise, if you want to detect the speakers in translating your videos, don’t forget to enable the “Identify Speakers” button. Once it is enabled, the system will automatically distinguish the speaker.
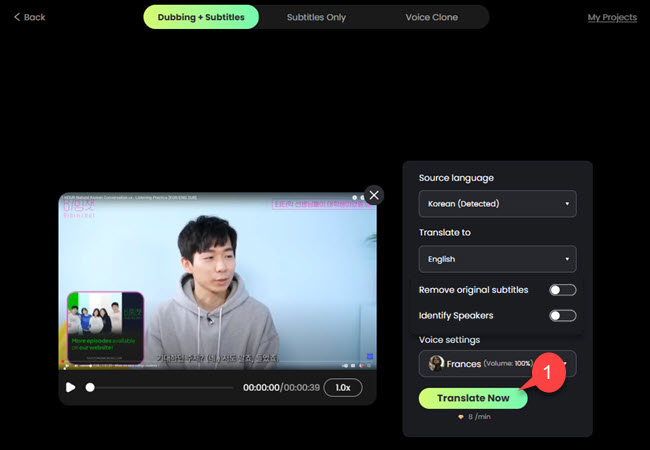
Step 6: Start the Translation
To start rendering the translated video, click “Translate Now” to start translating the video.
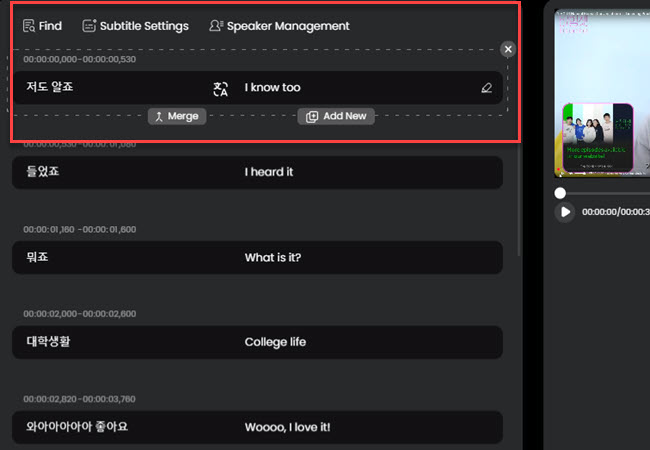
Step 7: Check the Result
Check if the translated subtitles are correctly timed and positioned. Edit any parts that need polishing by following these options:
- Edit subtitles: Click the “Pen” icon to modify the text, adjust timing. Then, click the “Subtitle Settings” to customize settings such as font, alignment, and more.
- Merge subtitles: Click “Merge” to combine two subtitle lines into one frame.
- Add new subtitles: Click “Add New” to insert an additional subtitle line.
- Re-translate: If needed, click “Re-translation” to generate a new version of the subtitles.
- Adjust Voice: Proceed to the “Speaker Management” option to select the voice for the specific subtitle and adjust its volume, allowing personalized customization.
Tips: Make sure to click the “Update” button every completing after edit.
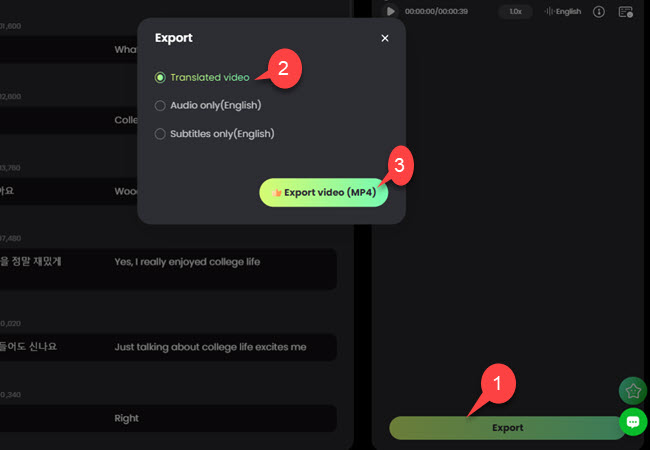
Step 8: Export Your Result
Once done, click “Export” and select the “Translated Video” save the video that includes subtitles added directly to the video which is great for posting online.
How to Use Subtitles Only
If you prefer silent translations, choose the Subtitles Only mode. It automatically generates accurate translated captions (SRT files or embedded subtitles) for your videos—ideal for tutorials, educational clips, and social media posts.
Step 1: Import Media File
From its main interface, you can upload the media file by dropping the video or by clicking the “Browse” button to select from the local storage of your computer.
Step 2: Head on to the Subtitles Only Tab
When the video is uploaded successfully, go to the “Subtitles Only” tab to focus the translation on your subtitles.
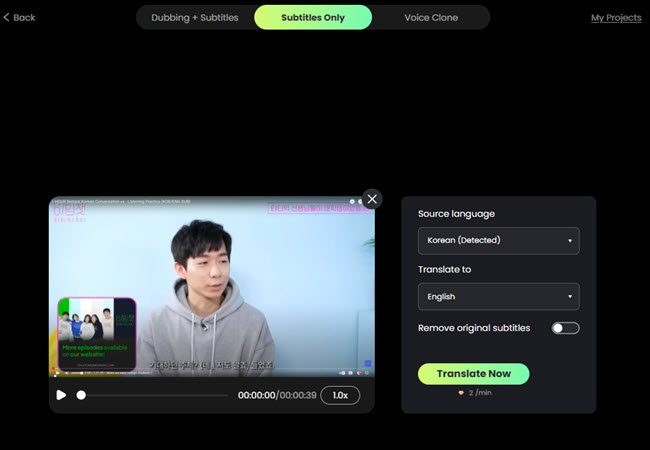
Step 3: Select Preferred Language
Click the “Translate to” button to see all the available languages offered by this tool and select the language you wish to use for your subtitle translation.

If you want to delete the original subtitles, enable the “Remove original subtitles” button.
Step 4: Translate Subtitles
After all, click the “Translate Now” button to start translating the subtitles.

Step 5: Check the Translated Transcript
Then, check the translated subtitles to see if it is placed correctly and edit if some parts need to be polished. Follow the specific steps that apply to your case:
- Click the “Pen” icon to start editing the text, duration of the script.
- To subtitle feature like its font, alignment, and many more click the “Subtitle Settings”.
- Otherwise, if you want to combine the two subtitles in one frame, click the “Merge” button.
- In case you need to add a new subtitle, just click the “Add New” button.
- Aside from that, you can also re-translate the subtitles by clicking the “Re-translation” button.

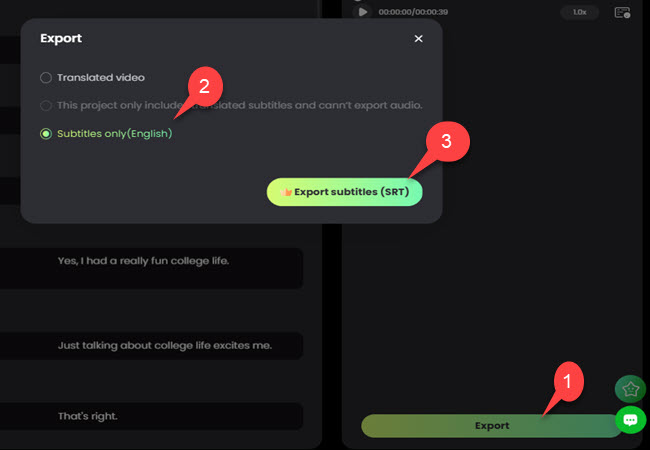
Step 6: Download SRT File
Finally, click the “Export” button and select the “Subtitles only” option to save the.SRT file on your computer.
How to Use Voice Clone
Bring your translations to life using the Voice Clone feature. This tool replicates the speaker’s original tone and emotion, producing a more natural and authentic translated voiceover that closely matches the original performance.
Step 1: Bring in the Media File
To get started, click the “Browse” icon or select from your “My Space” storage to upload to upload the media files you wish to edit.
Step 2: How to Voice Clone
Go to the “Voice Clone” tab if you want to match or clone the speaker’s original tone and voice to have more engaging results.
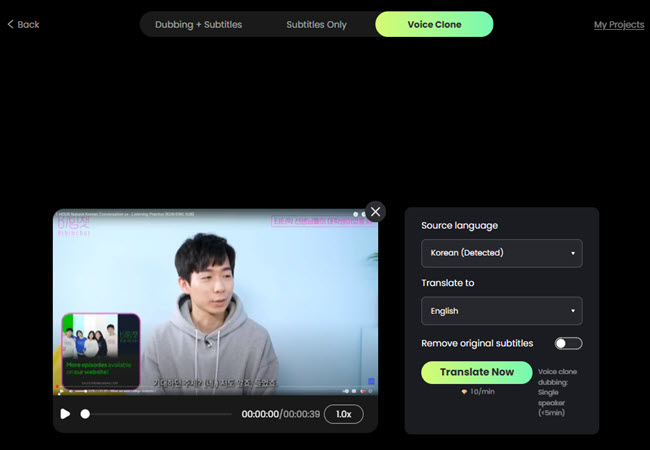
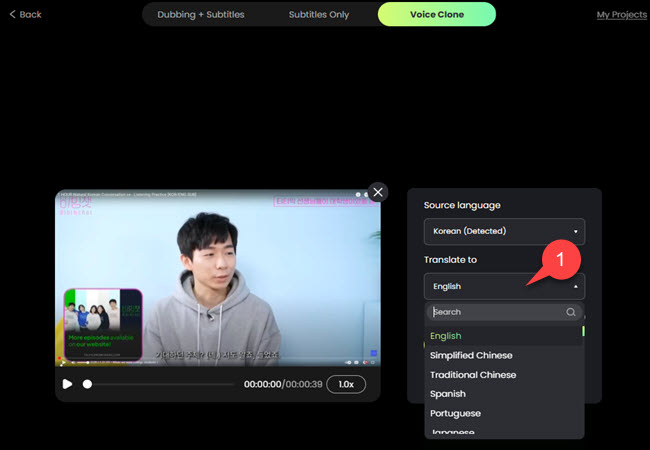
Step 3: Select Language for Voice Cloning
Once the video is already uploaded, the AI will detect the source language of the video automatically. Then, click the “Translate to” dropdown menu to select the language you want to use for voice cloning.
Step 4: Render Voice Cloning
To proceed rendering the voice cloning, click the “Translate Now” button.

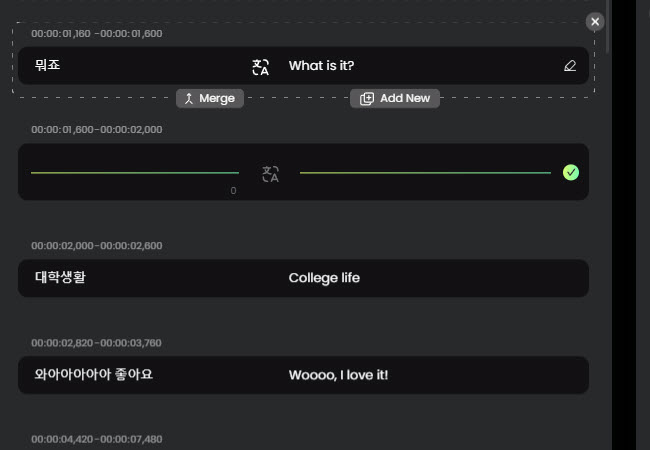
Step 5: Review and Fine-Tune the Translated Subtitles
Take a moment to review your translated subtitles and make sure they appear at the right time and look natural on screen. If you spot any parts that need adjustment, you can easily refine them using the tools below:
- Edit: Click the “Pen”icon to update the text, adjust timing. In order to customize subtitle style, such as font, size, and alignment proceed to “Subtitle Settings”.
- Merge: Combine two subtitle lines into one frame by clicking the “Merge” button.
- Add: Need an extra subtitle? Simply click “Add New.”
- Re-translate: If the translation needs improvement, click “Re-translation” to generate a fresh version automatically.
Step 6: Save the Output
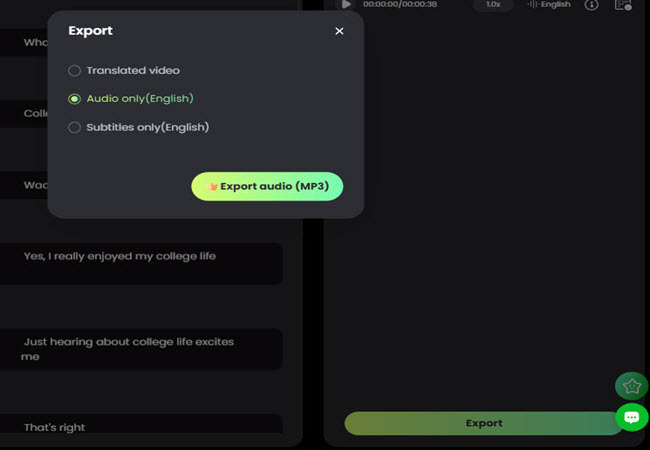
Lastly, click the “Export” button and select the “Audio only” to save the output on your computer.
Common Issues about RecCloud AI Video Translator
About Accuracy
RecCloud uses powerful AI technology to create clear and natural subtitles and voiceovers. While the tool delivers highly accurate results, we suggest checking the translation before sharing or publishing—especially for professional or public use—to ensure everything is correct and sounds natural.
What Is Voice Clone?
RecCloud’s Voice Clone feature enables you to keep the original speaker’s tone, pitch, and emotion after translation. With that being said, it means when you translate a video into another language, the voice still sounds like the same person speaking. Wherein it helps make your translated videos more natural, lifelike, and easy to understand for viewers.
Supported Formats & Languages
RecCloud supports a wide range of popular video formats, including MP4, MOV, and AVI, making it easy to upload and translate videos from almost any device. It also offers translation in over 100 languages—such as English, Spanish, Portuguese, French, Arabic, Japanese, and Korean—so you can reach a global audience and make your videos understandable to viewers around the world.
How to Fix Video Upload and Translation Problems Easily
How to Fix Video Upload and Translation Problems Easily
Having trouble uploading media files or translating your video? Don’t worry — it’s a common issue, and the fixes are usually simple. Below are the most frequent problems users face when uploading or translating videos, along with quick and easy solutions.
A. Video Won‘t Upload
- Check the video duration: Take note that the maximum video duration is only 3 hours. If your video is longer, make sure to cut it before using the media file.
- Use the right file format: Make sure your video is saved in a supported format. Unsupported file types may fail to upload properly.
- Check your internet connection: A slow or unstable connection can interrupt uploads. Try switching to a stronger Wi-Fi or reconnecting to your network.
B. Translation Stops or Doesn‘t Finish
- Refresh the page: Sometimes the translation process pauses because of temporary connection or server issues. Refreshing the page can often fix it.
- Re-upload your video: If refreshing doesn’t help, re-upload the video and start the translation again.
- Clear your browser cache: Old or stored data in your browser might cause upload or translation errors. Clearing your cache helps your browser run smoothly.
C. Still Having Trouble?
If these steps don’t solve your problem, please contact our support team.
Include details like your browser type, video format, and file size — this helps us fix the issue faster.
Start Translating for Free
Start translating your videos today — fast, accurate, and completely free with RecCloud AI Video Translator.


Leave a Comment