
Add Bilingual Subtitles for RedNote, TikTok, and YouTube in 3 Ways
- Why Bilingual Subtitles are Important?
- Methods to Add Bilingual Subtitles for Different Platforms
- Best Practices and Tips for Incorporating Bilingual Subtitles
- Frequently Asked Questions About Adding Bilingual Subtitles
Why Bilingual Subtitles are Important?
Before exploring this post’s three methods to add bilingual subtitles for YouTube, TikTok, and RedNote, you can first explore and understand why bilingual subtitles are important. So, bilingual subtitles are important for several reasons, all because they make content accessible and engaging for wider and language-diverse audiences. Here’s a breakdown:
- By adding bilingual subtitles to your content, you can expand its audience reach. It enables you to make your content understandable to people who do not natively speak its original language. In that way, you can pull in different people to watch your content, allowing it to expand its potential reach.
- Incorporating bilingual subtitles into your content will improve its accessibility. Content with bilingual subtitles isn’t only limited to those people who don’t speak its original language, but it is also accessible to people with hearing impairments or those who prefer watching content with subtitles.
- Lastly, by embedding bilingual subtitles in your content, you can enhance its SEO. Viewers are more likely to stay engaged with content longer if it has subtitles in their preferred language. As a result, the content is more likely to reduce its drop-off rate. Other than that, when your content with bilingual subtitles acquires a higher viewing duration, it tells YouTube and TikTok that it is worth watching, which raises its position in search results and suggestions. Furthermore, content with bilingual subtitles enhances visibility in search queries and attracts visitors worldwide by increasing keyword density in multiple languages.
Methods to Add Bilingual Subtitles for Different Platforms
Now that you know the importance of adding bilingual subtitles, it is time for you to explore this post’s three methods to add bilingual captions on TikTok, RedNote, and YouTube! Discover them below.
Rednote:
RedNote is equipped with a built-in media editor that supports subtitle features that you can access and use when uploading a video. Its subtitle feature enables you to automatically add bilingual subtitles to your content before uploading it. These subtitles include the original language used in the video and its Chinese translation.
Here is how you can use it:
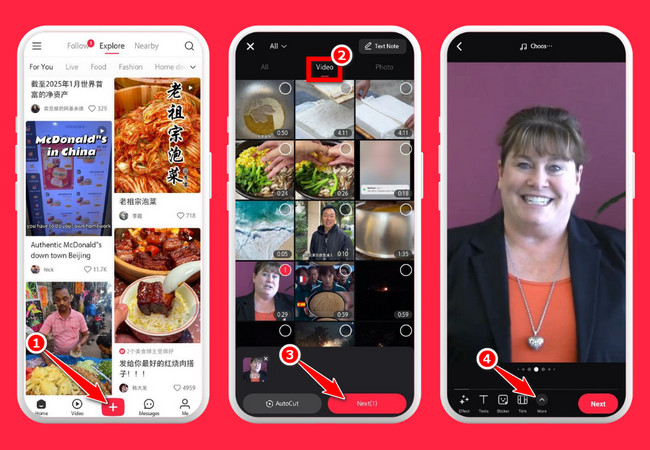
- On your RedNote app, tap the “Plus” button below, tap the “Video” tab, select the “video” you wish to upload, and tap “Next”. After that, tap “More” at the lower part of RedNote’s interface.
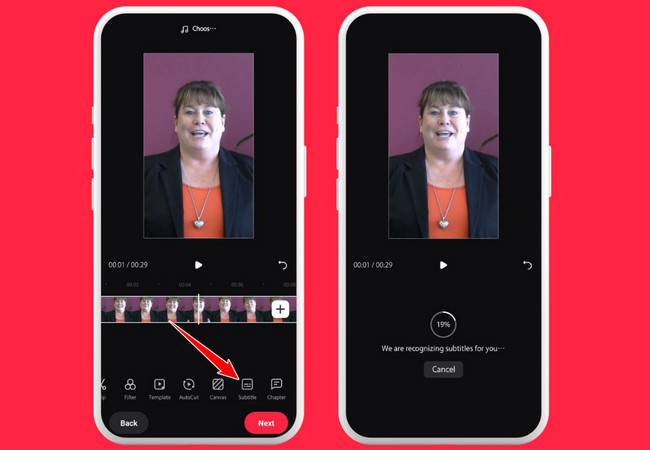
- Then, swipe your fingers to the option below to the left and tap the “Subtitle”. Upon tapping the subtitle option, RedNote will automatically initiate the process of generating bilingual subtitles based on your video.
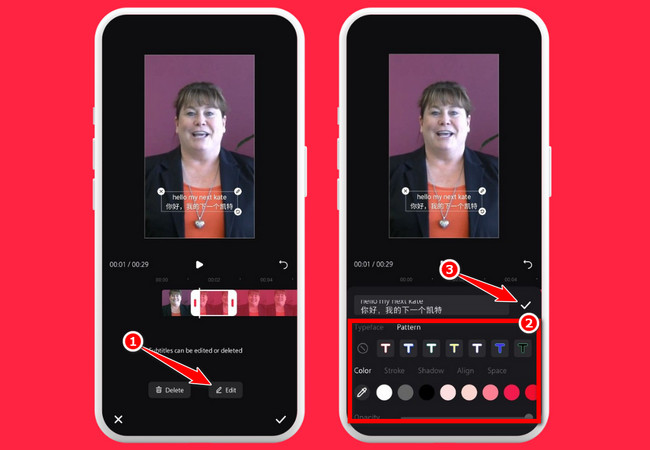
- You can add adjustments or changes to the generated bilingual subtitles by tapping the “Edit” button and using the following subtitles-related editing options available. Once you have finished editing, tap the “Check” button.
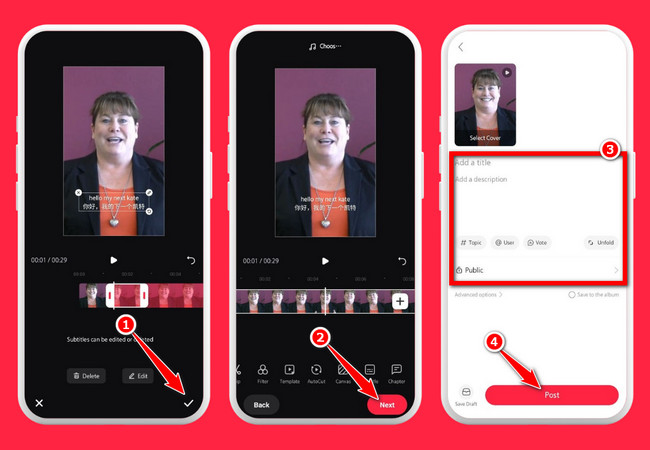
- After that, tap the “Done” button with the “Check” icon and tap “Next”. Add your preferred title for your video, description, hashtags, and more. Lastly, tap “Post” to upload your video with bilingual subtitles. And that’s how you add bilingual subtitles for RedNote.
Apart from using RedNote’s built-in subtitle feature, another solution you can use is the RecCloud AI Subtitles Generator for efficient bilingual subtitle creation. This AI-powered web-based tool enables you to automatically generate accurate subtitles for your video. It supports options to embed two subtitles (bilingual subtitles) in different languages, which are both accurately created and translated (more than 99 languages) based on the video’s original language. Additionally, it allows you to edit generated subtitles for greater accuracy and to customize their appearance according to your preferences. Moreover, within just a few button clicks, you can quickly and accurately add bilingual subtitles for Rednote!
Here is how you can use it:
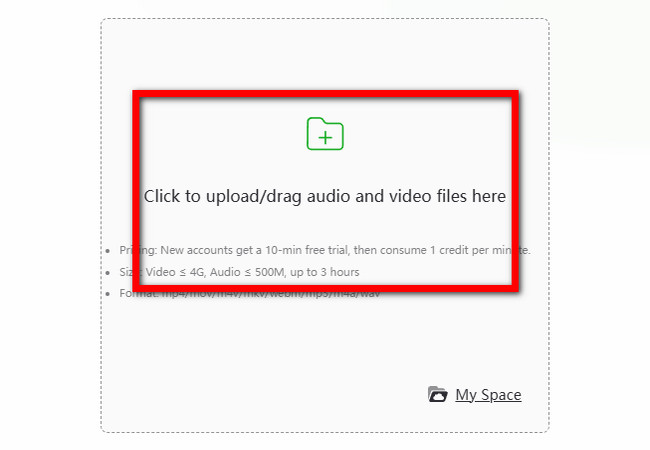
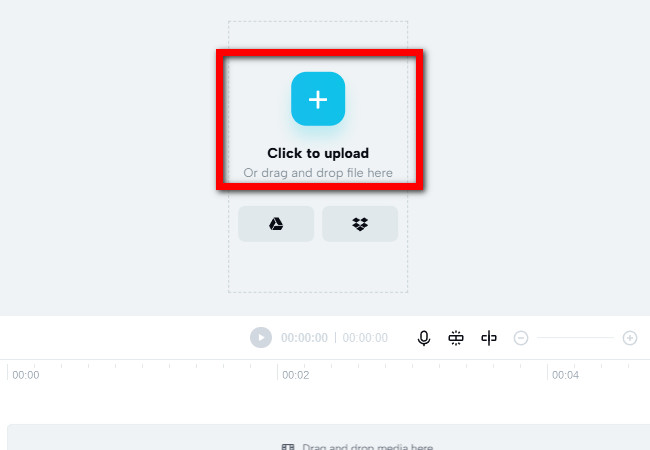
- Visit RecCloud’s official website and select “AI Subtitle Generator”. After that, click or drag and drop to upload the video you wish to add bilingual subtitles.
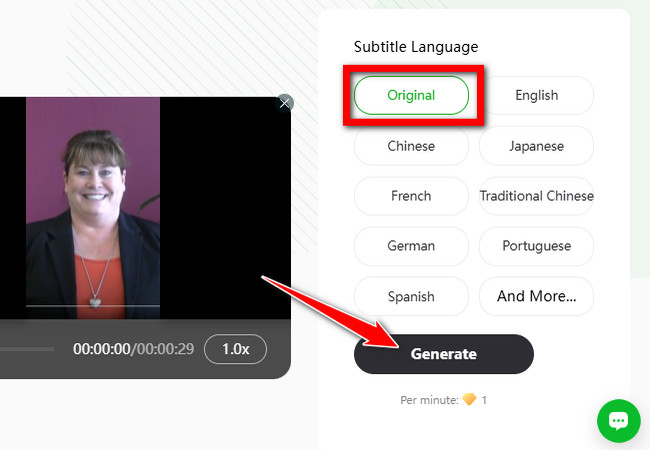
- Once the uploading is complete, select the “Original” to generate subtitles based on your video’s language used. You can also select a specific language based on your preferences. After that, click “Generate”.
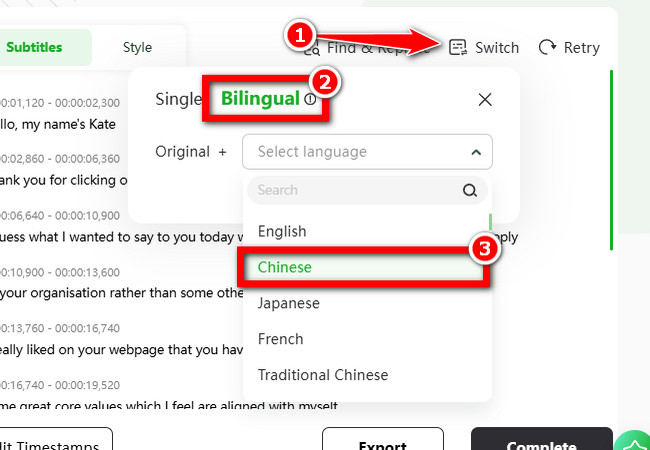
- Once the tool is finished generating the first subtitles, select the “Switch” option, click “Bilingual”, click the “Dropdown” icon, and select your preferred language for the other subtitle. Then, click “Confirm”.
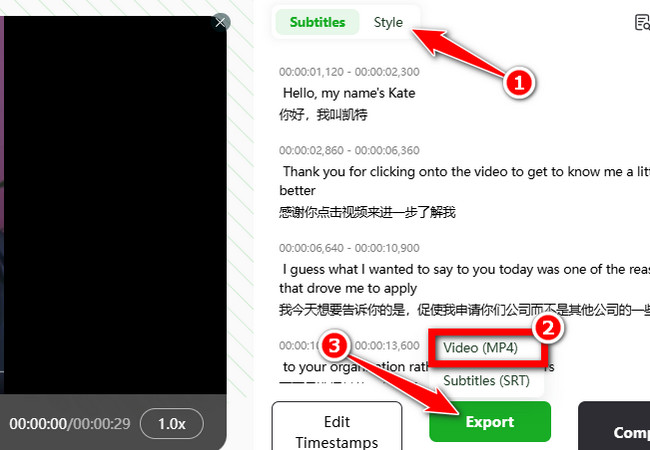
- After the subtitles generation process, click “Style” to edit the looks of the subtitles. Once you are done, click “Export” and select “Video (MP4)” to export the video with bilingual subtitles. And those are the ways how to add bilingual subtitles to a video.
TikTok:
Now, in terms of TikTok, the platform (web-based and application versions) doesn’t support an option that enables you to add bilingual captions. It only allows you to automatically generate one subtitle for your video written in the language you have chosen. This means it will not display two languages simultaneously. This also applies to Capcut as well, which is an editor app that is also a product of ByteDance. However, there’s a simple workaround that you can do to embed bilingual captions on TikTok using CapCut!
Here is how you can use it:
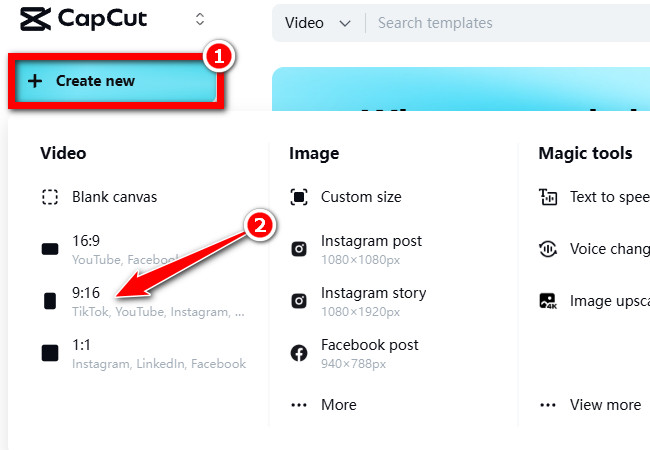
- For a much more convenient way to add bilingual captions on TikTok, you need to use CapCut’s web version. Visit its official website, click the “Create new” button, and since you wish to add bilingual subtitles for your video to be uploaded on TikTok, select “9:16”.
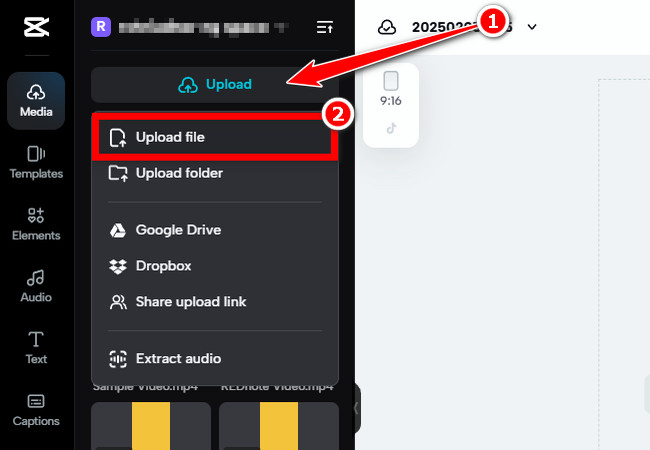
- Then, click the “Upload” button, select “Upload file”, select the video you wish to add bilingual captions, and wait for it to upload. Once uploaded, drag it to the timeline.
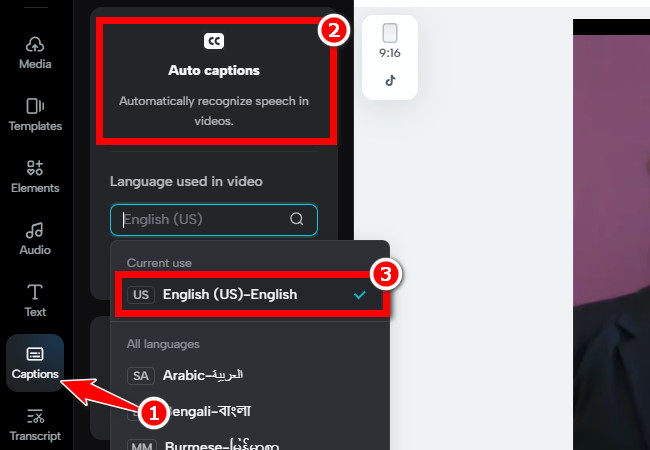
- Next, click the “Captions” tab, choose “Auto captions” from the options, and select the first subtitle’s language that you wish to overlay on your video. After that, click the “Generate” button.
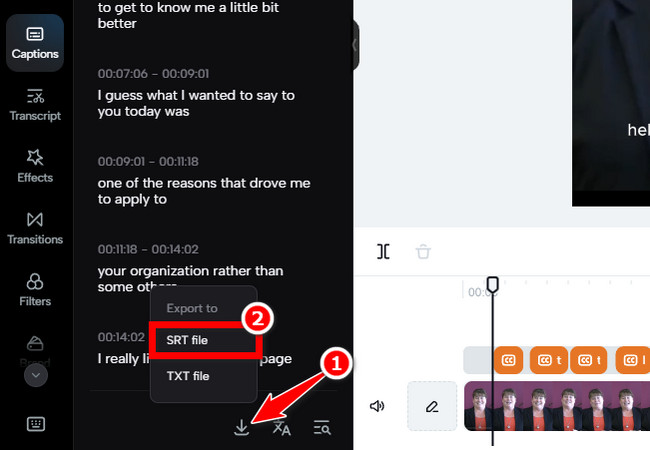
- Once the subtitle generation is complete, click the “Export captions” button with the “Arrow pointing down” icon at the lower part of the tool, and select “SRT file” to download the subtitle.
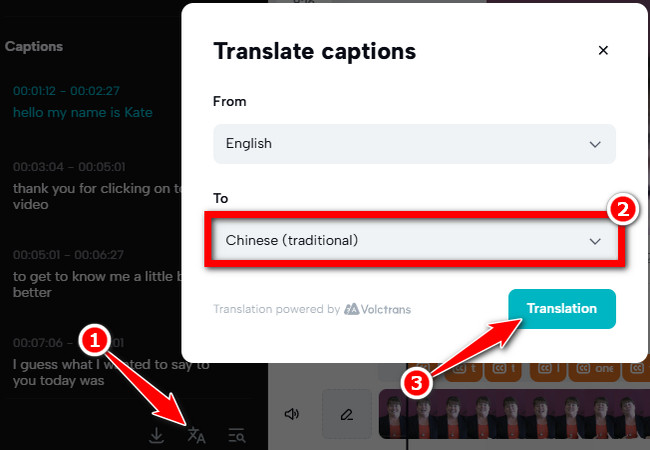
- Once the subtitle is downloaded, click the “Translation” icon below, select the second subtitle language based on your preferences, and click “Translation”.
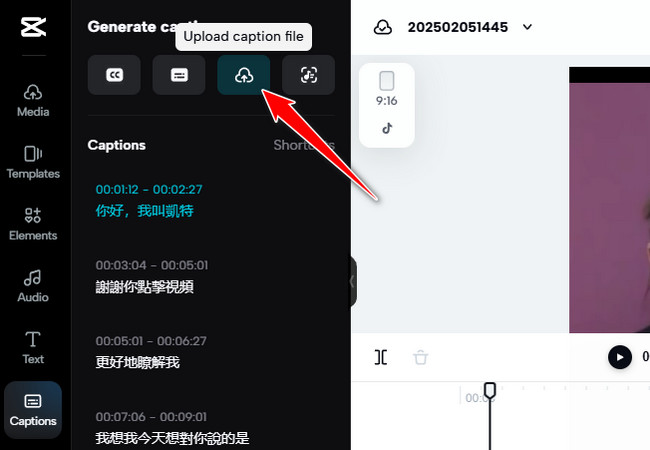
- If the translation is completed, click the “Upload caption file” above, look for the SRT file you downloaded earlier, and click “Open” to import it.
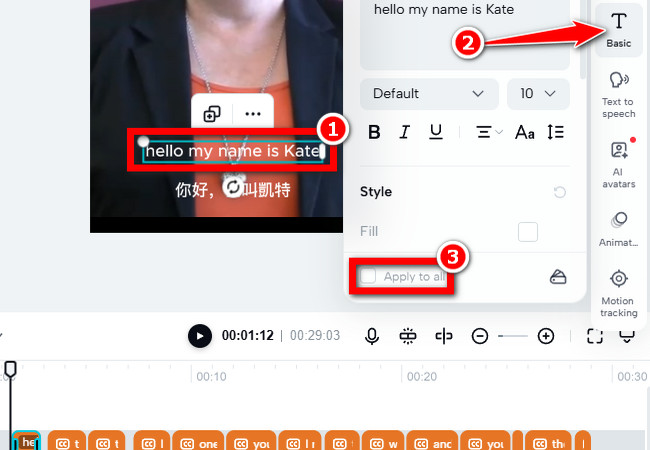
- Once the subtitle is imported, you will notice that it is overlaid on the subtitle you generated earlier. To arrange them, double-click the subtitle from the preview or in the timeline, click “Basic” on the right side, and uncheck the “Apply to all” checkbox.
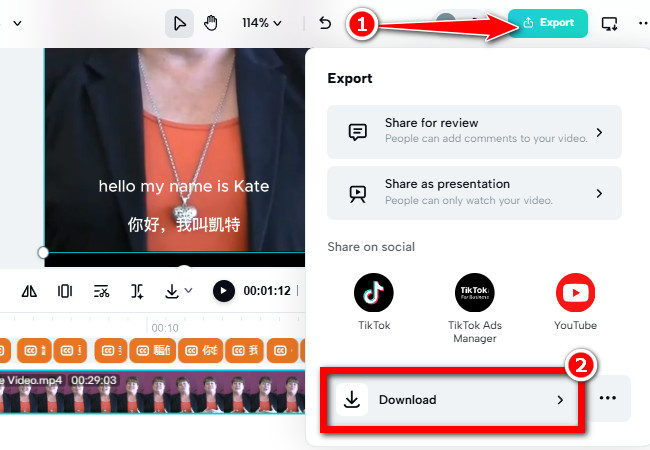
- Then, drag the overlaid subtitle below or at the top of the other subtitle. Then, for the other subtitles, perform steps 7 and 8 until you are done with their positions. Once done, click “Export” at the top right corner, and select “Download”. Those are the steps on how to add bilingual subtitles to a video for TikTok upload with the help of CapCut.
YouTube:
If you wish to add bilingual subtitles to your video with the help of YouTube, unfortunately, the platform can’t help you with that as well. The same goes with TikTok, YouTube also doesn’t have an option that enables you to embed two subtitles in different languages within the video and display them simultaneously. Yes, it does support an auto-captioning option which you can turn on while watching a YouTube video. However, this option only allows you to automatically generate a single caption for your video and offers you another option to translate it. In that case, it is not capable of displaying two different subtitles simultaneously.
Thankfully, there’s a simple yet clever workaround you can do to still be able to display your video with two different subtitles (bilingual subtitles). And the same goes with TikTok, you can do this with the help of CapCut. Explore the steps below to learn how to add bilingual subtitles to a video for YouTube upload.
Here’s how you do it:
- Visit CapCut’s official website on your browser, click the “Create new” button, and select “9:16” canvas size. After that, click to upload or drag and drop the video you wish to add subtitles on CapCut’s interface.
- Once done, click “Captions”, select “Auto captions”, and select a language other than the original language of your video. In the image below, since the video is in English language, it chose to generate Chinese subtitles. Next, click “Export” and select “Download” to export it.

- Then, upload your video on your YouTube channel. After that, go to the “Channel content” page, click the “Content” tab on the left, and access the uploaded video. Next, click the “Options” button with the “three-dotted” icon and select the “Get shareable link”.

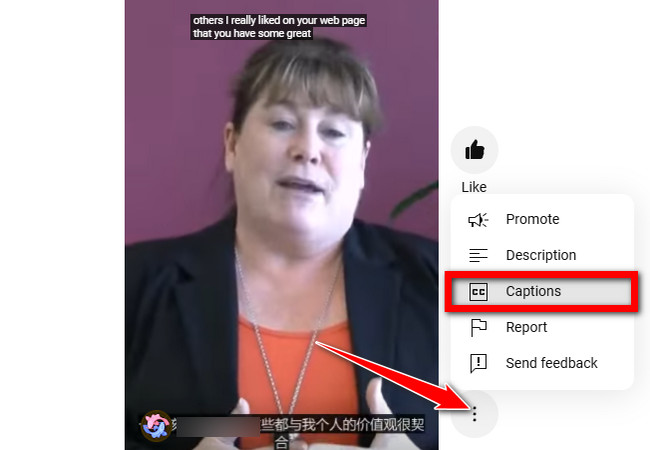
- After that, paste the link on a new tab of your browser and press “Enter” on your keyboard. Next, click the “Three-dotted” icon and select the “Captions” options to turn it on. Then, YouTube will automatically generate the second subtitle for your video.
Note: However, this will not always work. As you can see, it only enables you to create a bilingual subtitle effect. It doesn’t directly embed another subtitle to your video. Additionally, this workaround comes with various limitations, including inaccurate English captions, doesn’t have controls, synchronization issues, and more. In that case, using RecCloud AI Subtitle Generator would be better to incorporate bilingual subtitles for YouTube.
Best Practices and Tips for Incorporating Bilingual Subtitles
There you have it! Those are the ways how to add bilingual subtitles to videos for RedNote, TikTok, and YouTube uploads. Now, to ensure that you can create bilingual subtitles that will help your video or content enhance its viewer engagement and accessibility, here are the essential and best practices and tips! Explore them below.
1. Creating and Synchronizing Subtitles
- Utilize a Reliable Subtitle Generator – Use reliable tools that are natively made to automatically generate subtitles, like RecCloud. These tools can save time and help you create accurate subtitles.
- Adjust the Timing to Enhance Accuracy – Ensure that the bilingual subtitles appear at the exact moment the speaker starts talking and disappear at the right time. It would be better to use a tool that enables you to adjust the timing of the subtitles when it is needed. Additionally, keep the subtitles’ duration at a minimum of 1 second and a maximum of 6 seconds for readability.
- Limit the Subtitles’ Characters Per Line – Ensure that the bilingual subtitles are under 42 characters per line. If the sentence is too long, separate them rather than having too much text in a single clip or frame.
- Place Subtitles Properly – Place the primary subtitle at the top and the other one below. Additionally, to help viewers identify the two languages easily, you can use different colors or fonts.
2. Ensuring Subtitles Accuracy and Readability
- Manually Check Translations – Although subtitle generator tools are mostly AI-powered, you still need to check whether their output is accurate and keep the meaning of the content. Apart from that, you also need to check and fix grammatical errors, missing words, and unnatural phrasing.
- Maintain Consistent Format – Stick to the same font style, size, color, and positioning for all of your subtitles. Additionally, utilize proper punctuation to make the bilingual subtitles easy and natural to read. You also need to be consistent with the positions of your subtitles.
Frequently Asked Questions About Adding Bilingual Subtitles
1. How can I adjust the timing of the subtitles on RedNote?
To adjust the timing of the subtitles generated on RedNote, you just need to drag the edges of the red overlays on the timeline. This will enable you to control the time when the subtitles appear and disappear within the video.
2. Does YouTube automatically enable close captioning while playing a video?
Unfortunately, no. YouTube doesn’t automatically enable close captioning when playing a video. However, it does automatically generate captions for most videos through its speech recognition technology. Then, it’s up to you whether you wish to see it by clicking or tapping the CC icon.
3. Why does CapCut not automatically create subtitles for my video?
The video’s audio might contain background noise or unclear speech, making it difficult for CapCut to automatically generate subtitles or captions. Aside from that, you might not selected the proper language, due to an unstable internet connection, or you are using an outdated version of an application if you have installed CapCut.
Conclusion
There you go! Those are the three ways how to add bilingual subtitles to video! Including bilingual subtitles in your videos on YouTube, TikTok, and RedNote is a great approach to increase discoverability, accessibility, and engagement. Tools like RecCloud and CapCut offer adaptable solutions for TikTok and YouTube, where native options are few, while platforms like RedNote offer built-in functionality for simple bilingual subtitle production. Adopt these strategies to increase the inclusivity and global reach of your videos!
Appendix and Resources
To further enhance your understanding of adding bilingual subtitles and make the process even smoother, here are some helpful links, resources, and tools that you can check:
Subtitle Tools and Generators:
- RecCloud AI Subtitle Generator: An AI-powered tool that enables you to generate accurate bilingual subtitles in over 99 languages.
- CapCut Web Editor: A versatile video editing tool that allows you to manually add bilingual subtitles for TikTok and YouTube uploads.
Platform Guides:
- RedNote Official Guide: Learn more about using RedNote’s built-in subtitle features.
- TikTok Creator Portal: Explore TikTok’s features and best practices for video optimization.
- YouTube Help: Subtitles and Captions – Official guide for managing subtitles and captions on YouTube.
Additional Resources for Subtitles:
- Subtitle Edit – A free, open-source subtitle editor for fine-tuning subtitle timing and translations.
- Amara Subtitle Editor – A collaborative subtitle editing tool perfect for creating multilingual subtitles.


Leave a Comment