
[Step-by-Step] How to Turn YouTube to WAV with 3 Best Tools
- How to Convert YouTube to WAV Using 4kdownload.to
- Steps to Turn YouTube into a WAV Audio File through Evano
- Detailed Steps to Turn a YouTube Video into WAV with AISEO
- Bonus Tip: Best Way to Translate YouTube Video with High Accuracy
- FAQs About YouTube to WAV
How to Convert YouTube to WAV Using 4kdownload.to
The first web-based tool you can use to convert YouTube to WAV is 4kdownload.to. This tool offers a straightforward interface and an easy-to-initiate conversion process. Just paste the YT link, choose the WAV format, and that’s it. You can download the converted content right away. In addition, this tool preserves the metadata of the YouTube video and allows you to convert multiple videos simultaneously. However, when you click this tool’s download button, a new tab may automatically open with suspicious ads. Be sure to close it immediately.
Here’s how you can use it:
- Copy the link of the YouTube content that you wish to turn into a WAV file. Then, visit the 4kdownload.to website and paste the copied URL into the tool’s URL input field.

- Next, click the “Format” dropdown button, choose “WAV” from the options, and click “Download”. Then, scroll down below to access the conversion process.

- Once the tool has processed the video, click the “Download” button to save the converted YouTube video as a WAV audio file.

Steps to Turn YouTube into a WAV Audio File through Evano
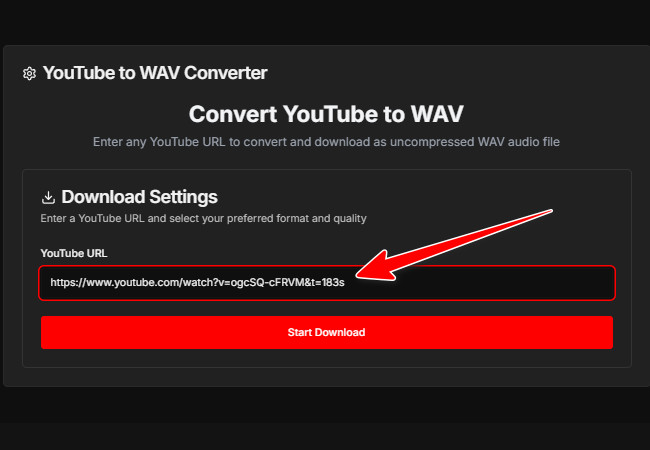
Another web-based tool you should try as an alternative is Evano. This free online YouTube to WAV converter offers a clean interface and an easy-to-start conversion process. Unlike the first one, you can convert YouTube videos to WAV format without being constantly distracted by unwanted ads. Although it still includes ads, it usually shows only a single pop-up, which you can easily close.
Here’s how you can use it:
- Head to the YouTube video you want to convert into a WAV file and copy its URL. After that, go to the Evano website and paste the copied URL into its link input field.
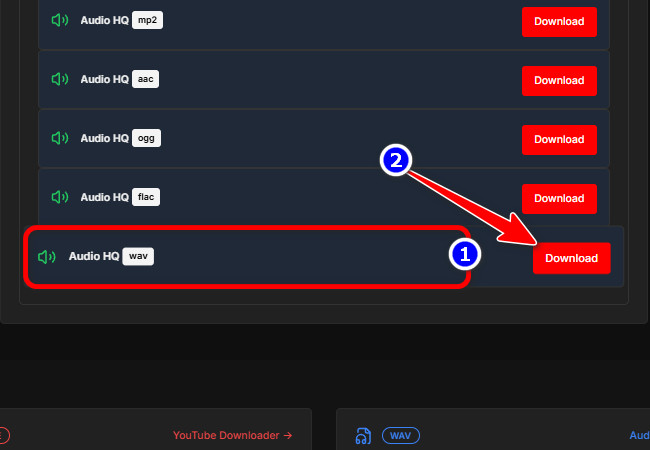
- Next, click “Start Download” and wait for the conversion process to finish. Once done, click the “Audios” tab, scroll down a little, and click the “Download” button of the “Audio HQ wav” option. And that’s it!
Detailed Steps to Turn a YouTube Video into WAV with AISEO
The last web-based tool recommendation that this post would like to share is to use AISEO to convert YouTube into WAV. Similarly to WAV.Ninja, AISEO also offers a fairly clean interface. It is not as clean as WAV.Ninja, but it does not come with unnecessary ad pop-ups, even after clicking a button or completing a conversion. In terms of its WAV output, this one offers a truly high-quality WAV file that will definitely provide you with a great listening experience.
Here’s how you can use it:
- Access the video content you want to convert into a WAV file on YouTube and copy its URL. After that, go to the AISEO webpage and paste the copied URL into its URL input field. Once you have done that, click the “Search” button.

- Once the tool is done searching and converting the content, click the “Download Wav” button to download and save the converted content to your device.

Bonus Tip: Best Way to Translate YouTube Video with High Accuracy
That’s it! Those are some of the best tools in the market that you can use to convert YouTube to WAV. Now, if you prefer to read a text version of a YouTube video in your preferred language, you can use RecCloud’s professional Free YouTube Video Translator. This web-based tool enables you to translate any YouTube video into your preferred languages, including Chinese, Japanese, German, and more, displayed as subtitles. It translates YouTube videos with 95 percent accuracy while still keeping the original thought or message intact across different languages. This is made possible by the tool’s context-aware AI. What makes this tool particularly noteworthy is that it lets you download and save the translated subtitles as an SRT file, which you can then read. Moreover, it is easy to use with no installs and no pop-up ads at all.
Here’s how you can use it:
- Copy the link of the YouTube content. Then, visit RecCloud’s Free YouTube Video Translator website and paste the copied URL into the tool’s link input field.

- After that, click the “Language” dropdown button and choose the language into which you want to translate the YouTube video. Then, click the “Translate” button to start the translation process.

- Once done, you can preview the translated version of the YouTube video by clicking the “Play” button. If you are satisfied with it, click “Download”, choose “Subtitle only”, and click “Subtitles (SRT)”.

FAQs About YouTube to WAV
1. Is it legal to convert YouTube video content to a WAV file format?
Converting YouTube videos to WAV for personal use is generally considered acceptable, as long as you don’t share, sell, or distribute the audio. It’s still best to respect the creator’s rights and only download videos that allow offline use.
2. Does turning a YouTube video into a WAV affect the audio quality?
Converting a YouTube video to WAV typically maintains high audio quality because WAV is an uncompressed format. The final quality still depends on the original audio, so if the source is low quality, the WAV file will not sound better.
3. Which tool gives the best audio quality?
AISEO generally provides the highest-quality WAV output. It preserves the audio quality fully without compression, making it an ideal solution for music or professional projects. The two other tools also provide good output.
Conclusion
Converting YouTube to WAV is a simple and effective way to enjoy high-quality audio offline, whether it’s for music, podcasts, or personal projects. By using reliable tools like 4kdownload.to, WAV.Ninja, and AISEO, you can quickly turn any video into a WAV file while preserving its sound quality. For those who also want to read or translate video content, RecCloud offers an easy way to get accurate subtitles in multiple languages. With these tools, accessing and enjoying YouTube content in the format you need has never been easier.


Leave a Comment