
OpenAI Whisper: Discovering What It Is and How to Use It
- What is Whisper by OpenAI?
- Who Can Utilize OpenAI’s Whisper?
- How to Use Whisper AI: Step-by-Step Guide [Windows, Mac, Linux]
- The Best Tool Alternative to Whisper AI [Free with High Accuracy]
What is Whisper by OpenAI?
Before diving into this post’s detailed guide on using Whisper AI, take a moment to explore its brief background. Whisper AI is a highly accurate automatic speech recognition (ASR) system designed by OpenAI. It can handle multiple languages, different accents, and background noise, making it a useful tool to transcribe audio, generate subtitles, and translate speech. It is trained on 680,000 hours of speech data and can recognize 99 languages worldwide. Additionally, Whisper AI is an open-source model that was released in September 2022. Since it is open-source, developers and content creators can use and integrate it into various projects, programs, and applications.
Who Can Utilize OpenAI’s Whisper?
Now that you have a brief background on Whisper AI, it is time to jump into the next question: “Who can use OpenAI Whisper?” Anyone who needs to transcribe speech to text can use it, including the following:
- Students who wish to convert recorded discussions or learning materials into text.
- Podcasters who want to create a text copy of their podcast sessions to use as subtitles or text-based posts.
- Meeting leaders or facilitators who want to produce meeting minutes or a text-based document of their previous online meetings.
- Content creators or video editors who need to create subtitles for a specific video.
How to Use Whisper AI: Step-by-Step Guide [Windows, Mac, Linux]
There you have it! That was a brief background on Whisper AI and who can use it. Now, it’s time to get started. In this section, you’ll explore this comprehensive guide on how to use Whisper by OpenAI. But before that, you need to understand that Whisper is not like tools that have a download site with a ready-to-install file. You need basic knowledge of the command line on Windows, Mac, or Linux to install and use it on your computer. If you are a complete beginner, don’t worry; this post will walk you through everything step-by-step. So, without further delay, start following the steps below:
Step 1: Install Necessary Tools on Your Computer
The first step is to install a few necessary programs before you can fully install and use Whisper AI. These programs include Python, required for running and installing Whisper AI; FFmpeg, necessary for handling audio files; PyTorch, essential for Whisper’s machine learning framework; and Pip, possibly needed for managing dependencies if using an older Python version. Now, you can start by installing Python on your computer.
1. Install Python
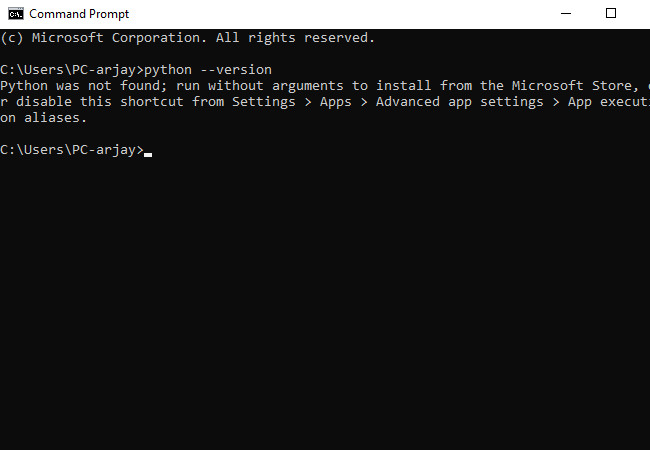
- Check if Python is installed on your computer by opening your Windows Command Prompt and typing “python –version” (don’t include the “”). Otherwise, if you are using a Mac and Linux computer, open its “Terminal” and enter this code: “python3 –version” (don’t include the “”). If it shows Python 3.8 or higher, you can skip this step. Otherwise, perform the steps below.
For Windows:
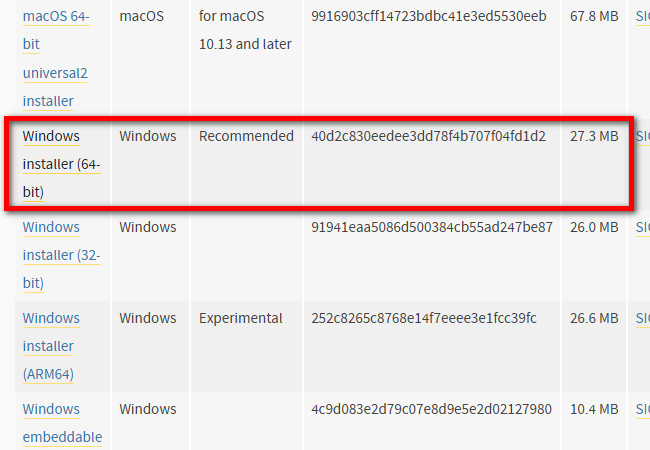
- If you are using Windows, visit Python’s official download webpage, click the “Download Python 3.13.2” button, scroll down until you reach the “Files” section, and click “Windows installer (64-bit)” to get the installer.
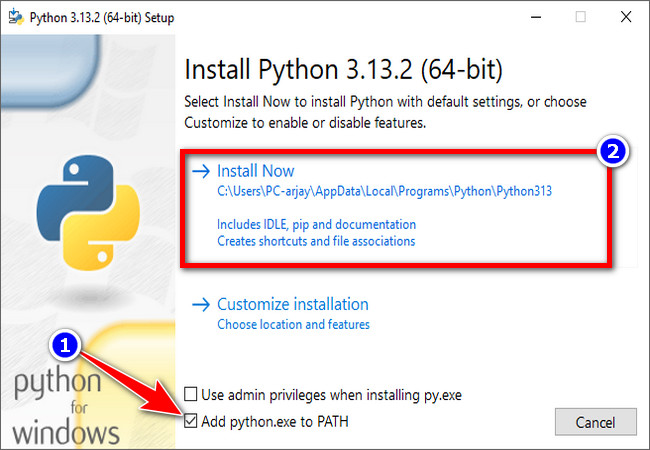
- After that, click the downloaded installer, tick the “Add python.exe to PATH” checkbox, and click “Install Now”. Once the installation is complete, you can verify it by going back to the terminal and entering this code again: python –version
For Mac:
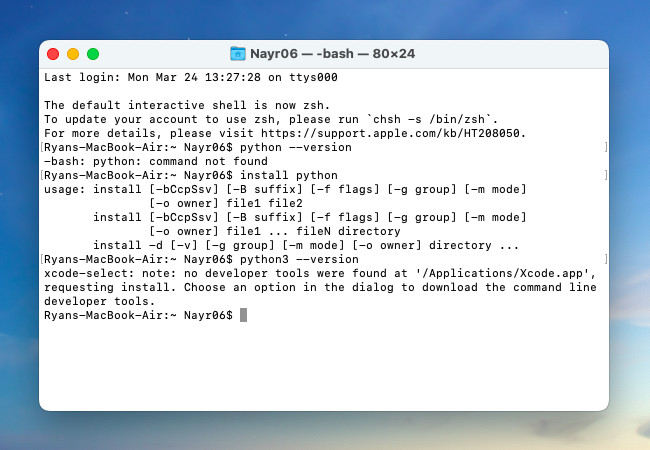
- Run your Mac’s “Terminal” and install Python using Homebrew. Just type this code: install python and press the “Enter” key.
- After that, confirm the installation by entering this code: python3 –version
For Linux:
- Access your device’s “Terminal” and run this code to update the package lists: sudo apt update
- After that, install Python by entering this code: sudo apt install python3 and press the “Enter” key.
- Next, verify the installation by typing this code: python3 –version
2. Install FFmpeg
Now that you have installed Python on your computer, you can now proceed with installing FFmpeg. This tool will help you convert the recorded audio file into a format that Whisper AI can process. So, how to download FFmpeg? Here are the steps you need to follow:
For Windows:
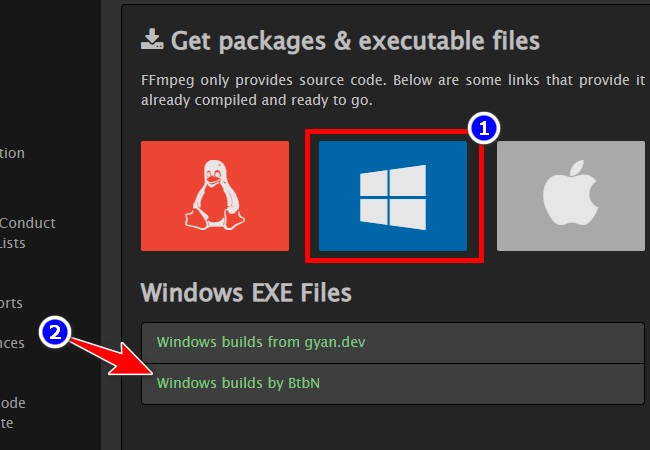
- Visit FFmpeg’s official website, scroll down until you reach the “Windows” icon, and click it. After that, select the “Windows builds by BtbN” from the two EXE files below the icon.
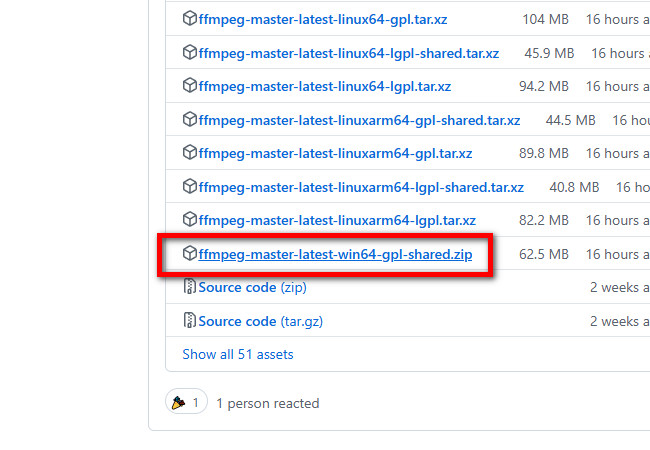
- Next, from the list of Assets, select the one that matches your system. Suppose you choose the “Win64-gpl”, and wait for the downloading process of the zip folder to finish. Once done, extract the files to a specific folder and access them.
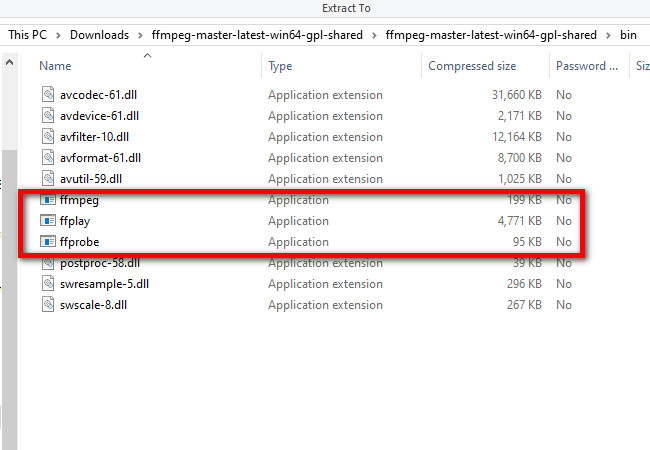
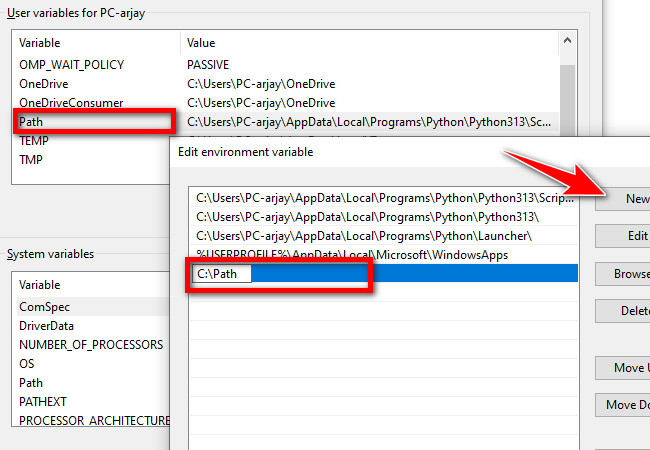
- After that, you will see three applications in the “bin” folder. Install these applications by heading to the “Local Disk (C:)” and creating a folder. Then, name the folder “Path”, copy the three applications, and paste them into the Path folder you created.
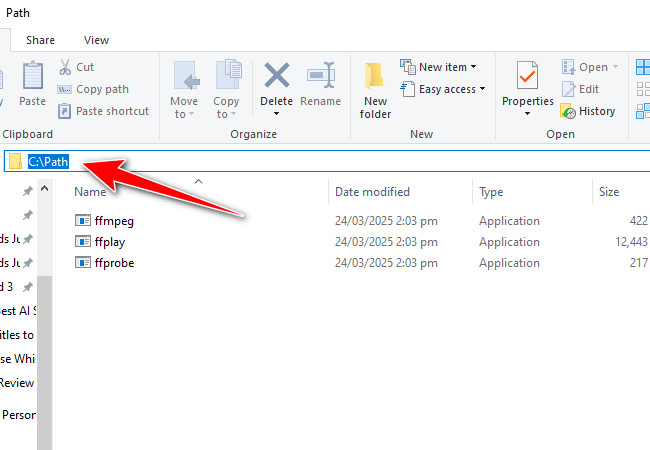
- Next, copy the Path file directory by clicking the “Folder” icon. Then, click the “Start” button, look for the “Edit environment variables”, and access it.
- Select the “Path” option and click the “Edit” button. After that, click the “New” button to add a path and paste the “Path (C:\Path)” folder, and click the “OK” button.
For Mac and Linux, you can utilize their corresponding Terminal to install FFmpeg. These are the steps you need to follow:
For Mac:
- Access your Mac’s “Terminal” and type this code to install the “FFmpeg” using Homebrew: brew install ffmpeg
- After that, press the “Enter” key, and Homebrew will download and install the FFmpeg with its dependencies.
For Linux:
- Open the “Terminal” and type this code to update the package lists: sudo apt update
- Next, press the “Enter” key. After that, type this code to install FFmpeg: sudo apt install ffmpeg and press “Enter”. Then, type “y” when prompted to confirm the installation.
3. Install PIP
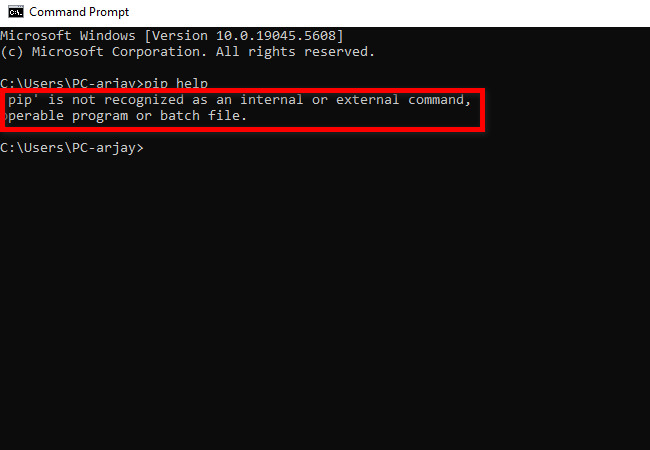
There you have it! Those are the simple steps on how to install FFmpeg as part of the Whisper AI installation process. Now that you are done installing Python and FFmpeg, it is time to install PIP. This tool will work as a package installer and management tool for Python tools and packages. The newer version of Python comes with a built-in PIP. On the other hand, older versions require users to download PIP if they want to manage PyPL installations via the command line.
Now, for you to ensure that PIP is installed or present in your Python, just enter pip help in the command line. In case you receive an error message, you can install it by accessing PIP’s official webpage and following the provided operations.
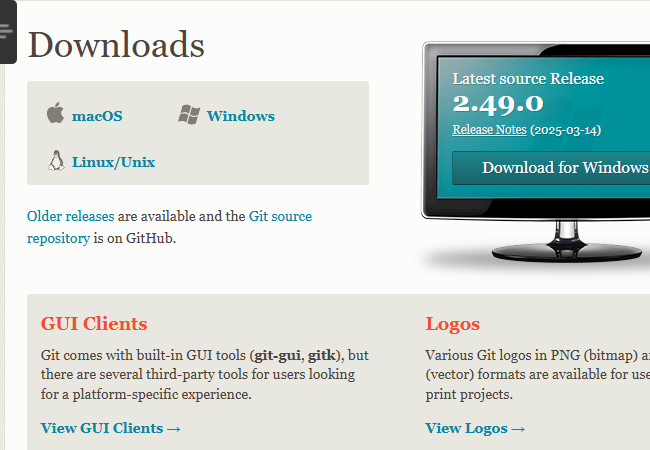
4. Install Git
Apart from Python, FFmpeg, and PIP, you also need to install Git, since Whisper AI files are present on a GitHub repository. Now, to download, install, and configure this tool, you need to visit Git’s official download site and choose the options that suit your device.
5. Install PyTorch
The last tool you need to install is PyTorch. PyTorch is a tool that helps computers learn and process information while using a powerful graphics card (GPU) or just a regular processor (CPU). Developers like it because it’s fast, flexible, and easy to work with, making it great for AI projects like Whisper AI.
To install this one, you just need to go to PyTorch’s official website and select your preferred installation preferences based on what you will be going to use. Next, copy the command line codes and paste them on your computer’s CMD. After that, press the “Enter” key to download PyTorch.

That’s it! Those are the five tools that you need to install to get Whisper AI working. Now, aside from them, you might also need to consider installing NVIDIA CUDA and Rust. However, both of them are not essential for using Whisper AI in most cases. CUDA is required only if you want to speed up processing with a GPU, and Rust is needed only for certain advanced versions like whisper.cpp. If you’re just installing and running Whisper with Python, you can skip these tools.
Step 2: Install Whisper AI
Now that you have all the required tools, it is time for you to install OpenAI Whisper! To this, here are two different ways you can do to install it:
Option 1: Install it via PIP
- Run your device Terminal (Mac/Linux) or Command Prompt (Windows). After that, install Whisper AI using PIP by entering these codes: pip install openai-whisper
- Once the installation is finished, verify it by entering this line of code: whisper –help. If you saw a line of commands, that means Whisper is successfully installed.
Option 2: Install it via GitHub Repository
- Access your Command Console and run this code: pip install git+https://github.com/openai/whisper.git
You can choose either of the two methods above. If one of them works, you no longer need to try the other. However, if none of them work, you need to go check the tools you have installed earlier and confirm whether they are successfully installed or not.
Step 3: Transcribe a Recorded Audio Using Whisper AI
Now that you have everything set up, you can try transcribing audio using OpenAI Speech to Text or Whisper AI. Here are the steps you need to follow:
Option 1:
- Suppose you already have a recorded audio file. In that case, save it in a folder and name that folder “Transcribe”. Then, run a new command prompt from the folder by clicking the folder’s directory and typing “cmd”.
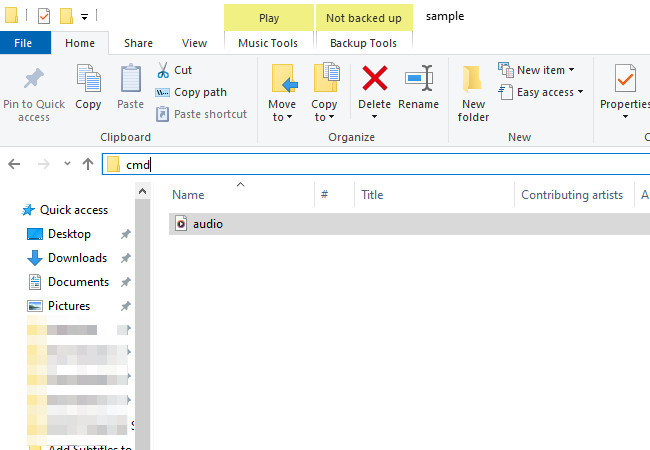
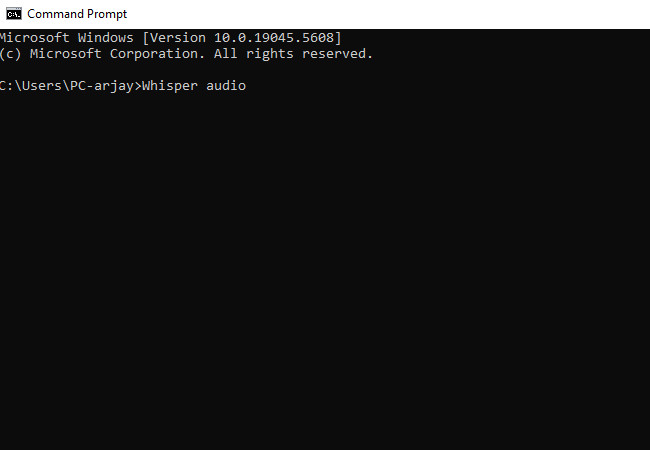
- Next, in the command prompt’s interface, type whisper followed by the file’s name that you wish to transcribe. If there are spaces between the file’s name, you need to add apostrophe marks. And that’s it! You need to wait until the transcription is complete!
Option 2:
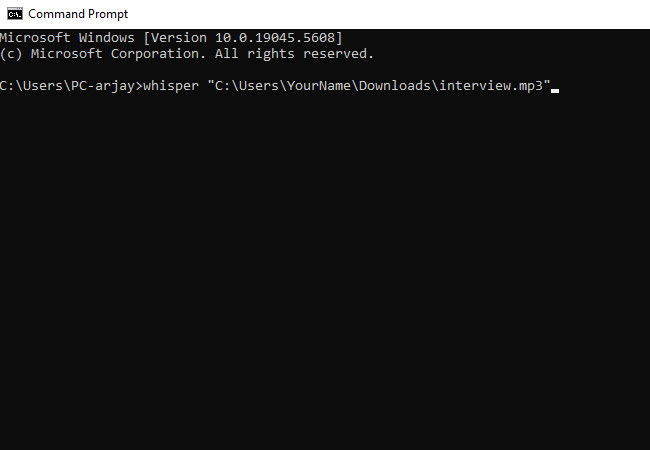
- Type in this code on your device’s command line: whisper path/to/audio.mp3 –model small
Note: Replace the path/to/audio.mp3 with the actual file path. For example whisper “C:\Users\YourName\Downloads\interview.mp3″ –model small (Windows) or whisper “/Users/YourName/Downloads/interview.mp3” –model small (Mac). After that, wait until Whisper processes the audio and generates an accurate transcription output.
The Best Tool Alternative to Whisper AI [Free with High Accuracy]
That concludes the comprehensive exploration of the Whisper AI tool for transcribing speech to text. Now, transcribing video and audio to text doesn’t have to be confusing, labor-intensive, or result in numerous errors and a lack of assistance.
If you’re considering an alternative to Whisper AI, RecCloud’s Free Online AI Speech to Text tool is a solid choice. This multi-platform tool leverages advanced speech recognition technology to accurately recognize and process speech in multiple languages. It transcribes text in a polished format with speaker identification and allows you to edit it to apply your adjustments. Additionally, it lets you translate the transcribed text into Chinese, Spanish, Japanese, and more in both single and bilingual formats. What makes this tool different from Whisper is that it provides an easy-to-access webpage with user-friendly features that offer accurate transcriptions and translations. Moreover, although it might look simple, this tool can meet everyone’s transcription needs.
Key Features:
- Accessible on various platforms, including browsers, Windows, Android, and iOS.
- Generates a summarized version of the transcribed text to capture key points easily.
- Supports an AI chatbot that allows you to ask questions and generate subtitles.
- Stores your transcribed text in the cloud, which you can access on various devices.
- Enables you to record audio in real time and transcribe it into text afterward.
Here’s how you can use it:
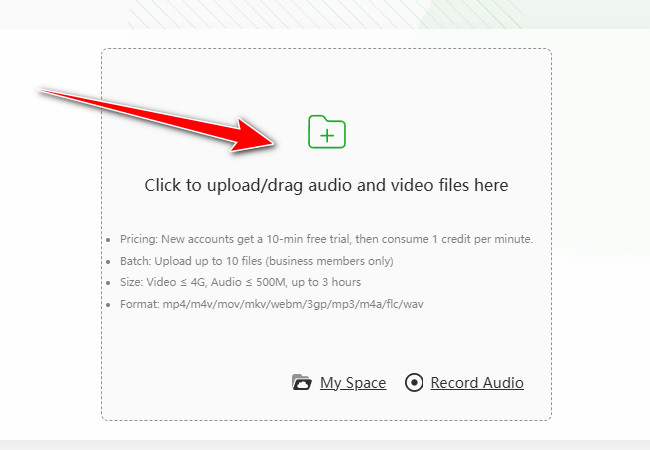
- Visit RecCloud’s Free Online AI Speech to Text website, click to upload, or drag audio and video files directly on the tool’s interface. After that, wait for the tool to finish processing your video.
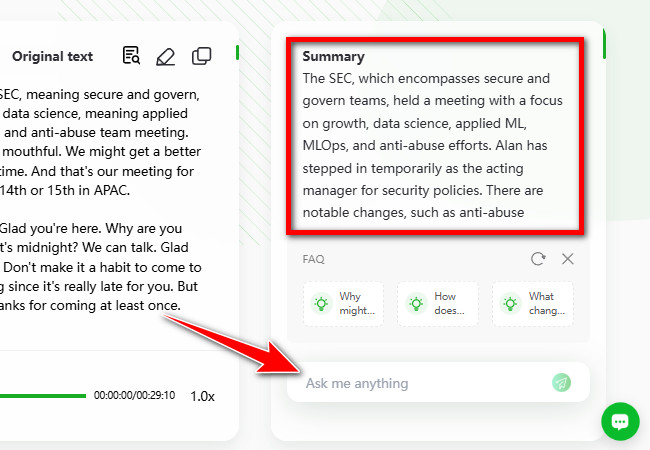
- Once done, the tool will automatically preview the AI-polished version of the transcribed text on the left. You can edit it by clicking the “Pencil” icon to add your adjustment or translate it into another language in either single or bilingual formats.
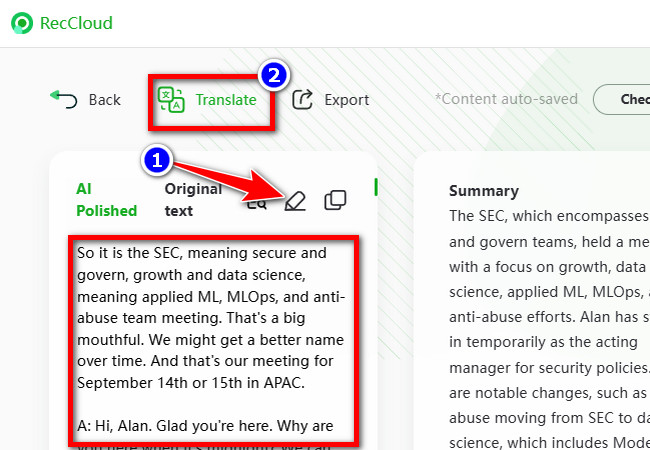
- On the right side, you will see the summarized version of the transcribed text. If you wish to clarify or deepen the information from the transcribed text, you can enter your query in the “Ask me anything” input text field below.
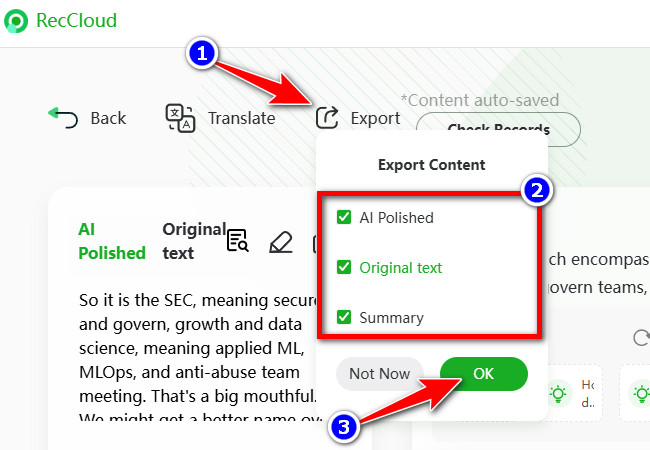
- Next, click the “Export” tab, choose which of the options you wish to export, and click the “OK” button. Then, the tool will automatically download the transcribed text as a DOCX file. And that’s how you use this tool as an alternative to Whisper AI.
Conclusion
Now that you’ve finished exploring this post’s comprehensive guide on how to use Whisper AI, it’s time to follow the steps and start transcribing speech! If you find the process too tedious and time-consuming, you can use RecCloud’s Free Online AI Speech-to-Text tool as an alternative. With this tool, you can easily, quickly, and accurately transcribe audio and video files for free. Visit the website and give it a try today.


Leave a Comment